I find that I’ve let my buffer lapse and with needing to go investigate ear pain in the 6 year old this morning (swimmer’s ear), I didn’t get a post up in time for my 9 am deadline. I was working on other things this week. With my brother’s wedding coming up next month and me planning to travel out with 3 young girls, I have been contemplating luggage and packing. A few years back, inspired by duffels my mom made all of us in my youth, I made two duffel bags for my oldest girls to visit a family reunion. They ended up slightly smaller than intended and were packed to the gills then; with them being used as swim or gym bags for the past few years, I decided that’s an activity to which they’re more suited and I’d put together some larger bags for this trip.
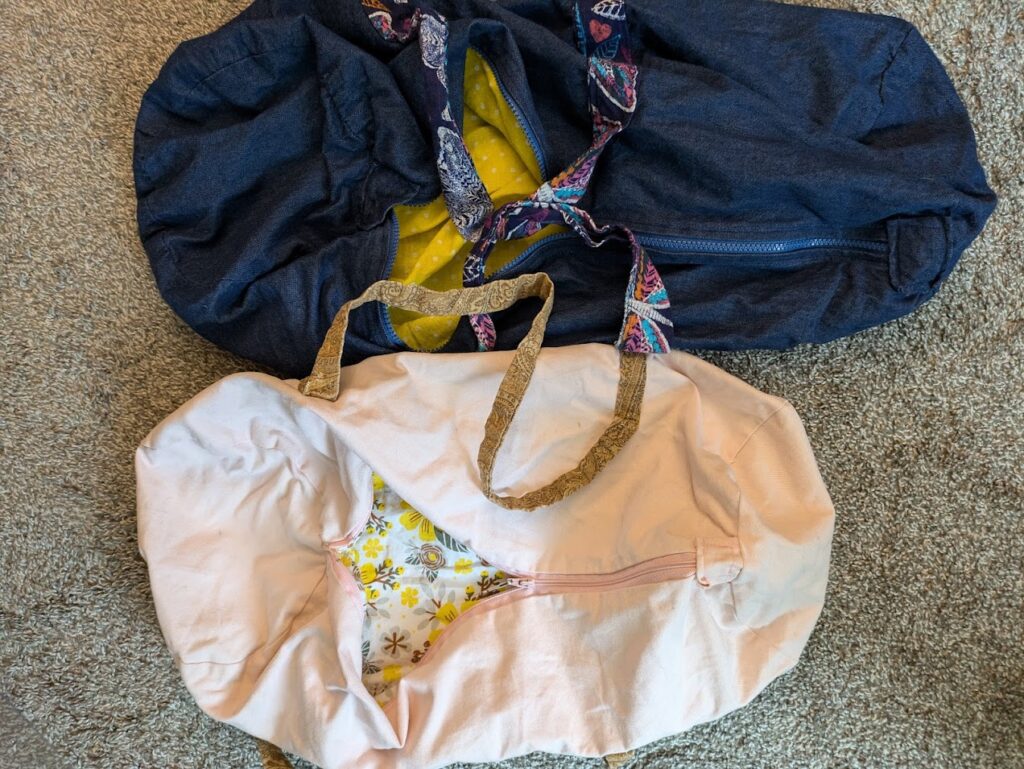
The above is a comparison of the completed duffel bags. The bottom one was based on a pattern I found online but the actual “recipe” is fairly simple and I’ll discuss that first. Disclaimer: I’m no pro, I sew for fun and have gotten decent at it but if you’re here learning to sew… why? I mostly put writing stuff on this site. But the instructions are here; they assume you’ve got a basis in sewing already.
Two equal sized circles form the ends and a rectangle of height equivalent (and about an inch longer) than the circle’s circumference, the length equivalent to the zipper. To get a consistent size for the ends, I found a pot lid of the size I wanted and traced around it. Cut each set out twice, once in a durable fabric for the exterior and one a lighter weight for the lining.
I sewed the linings first. I gave the length sides where they would meet the zipper a quick hem to simplify things, then sewed the end circles to the rectangle. I double-stitched the seams for security, partly because I like to, as my sister-in-law once said, “engineer for the apocalypse,” and partly because I used some pretty cheap fabric and it made me feel more secure.
The exterior takes an extra step- the straps. Rather than worry about sewing the straps inside-out and then having to pull them all the way through to turn it right-side-out, I sewed it up along one side with a double hem turned in and called it good. When I asked the girls about fabric, they chose a flannel with butterflies for the straps which is quite handsome. I cut this in 4-inch strips then sewed them end-to-end to make a continuous strap that was probably 4 times my height or more. I cut this in segments to sew to the duffel bags. It goes on the exterior rectangle right-side, parallel to the length side that will be sewn to the ends. Sew it in a rectangle, starting several inches away from the hem to allow for an actual holdable strap. You’ll do two rectangles, leaving loops at the end.
Once the straps were on, I followed the same steps to assemble the exterior shell- hem the zipper sides, sew the ends to the other sides, double-stitch (for security), turn right-side out. It should at that point look like a bag, handles and all.
The last step, putting it all together, wasn’t exceptionally difficult. Put the lining inside the shell, wrong sides facing each other on the inside. Basically how you want the bag to look when it’s finished. Then the two sides are attached at the zipper. Take the hemmed sides (which you already did to make it easier on yourself, well done and good thought!), pinch them around the zipper with clearance for the pull to pass easily, and sew it up. And the bag is done. If I work on it carefully and don’t make any mistakes, I can probably get one bag done start to finish inside of 3 hours. Faster if I got more used to it.
The next thing I’m discussing is improvements this round over my last round of duffel bags. First, size- I made sure my end circle pattern was larger than the previous by a few inches. I folded the ends of each up so you can see the end circles. Not clearly perhaps; if I’d used contrasting fabric it’d be more distinct and could be a pretty cool bag but it’s not what I made this time. Then making the length of the bag longer was also pretty simple. Second, zippers- the first set uses clothing zippers which feels difficult to pull and not as secure. This time I used parka/sport zippers with chunkier teeth and a larger pull. Finally, straps. Last time I read on the pattern I used “two inch straps” and, being not thinking it through, I cut straps that were 2 inches wide. Which, of course, when folded over became one inch. It wasn’t terrible, but it was pretty thin. I very nearly cut them in 5 inch widths this time to have good chunky straps but stuck with 4 inch. This still doubled the size (if not more considering seams) of the straps which I think will be more comfortable.
The last thing I want to discuss is method and mistakes. One trick I learned to make sure the fabric stays square and frays less, twists less, and so forth, is to tear rather than cut. Do this first and from the edges from which you will measure. Cut a notch a few inches in from the edge and start tearing. If it goes off the side of the fabric, good. You’ve learned 2 things- first, this fabric definitely needed some evening, and second, which direction it’s angling. Go to the other side, cut a notch, rip. Measure from your new edge, cut notch, rip. Do this to the other edge as well (unless one edge is the selvage edge, already woven; that side doesn’t need this). You now have fabric that follows the grain and will therefore be less likely to fray and warp. This only works for rectangles though.
I also, when doing zippers like this that I don’t want to lose in a seam, add a tab like you can see in the photo at the end. Be careful and walk your needle manually across the actual part with the zipper or you will probably snap the needle. But doing this creates a new “end” for the zipper and keeps it from tucking into the seam and being hard to grab. It also can cover a slight mess up on measurements.
Another thing I did that took longer, used more thread, but I think helped in the end, was with the straps. I sewed a quick sloppy seam folding over a hem on both sides of the 4-inch strap so that when I folded it in half and sewed it together, I didn’t have to fold the ends under as I went. I think the end result is that the seam is less likely to fall apart and fray since I know I didn’t get too close to the edges. Also extra seams, although I might pick those out…
Mistakes- I’ve made a few. I had to pick my second bag apart on several seams several times because I sewed the wrong end up on the ends. Which was great because that meant I’d put the straps on the wrong way so I had to pick those off as well. But I did it; it was better than giving up or starting over. And after it’s been through the wash, you won’t be able to tell it was assembled sideways at first. Ripping stitches is frustrating and takes a long time but sometimes when I’m working on a quick-and-dirty project, I get overly cocky and start going measure once, cut twice. Y’all. Learn from my mistakes. Don’t do that. It takes a moment to double-check and an hour to pick out stitches.
Anyway, I’m pretty pleased with the end results and hope that I’ve learned a few lessons about care. Maybe taught a few things about making duffel bags if anyone wants. Until next time.
Intellectual Property of Elizabeth Doman
Feel free to share via link
Do not copy to other websites or skim for AI training